Following a complete sign-in
All domains, credentials, codes, and tokens in these examples are fictional. Fixed, readable values make the example easy to follow. A real relying party generates fresh, unpredictable values for every attempt.
You open the printer's website on a Thursday morning, 1 October, to start a new photo book. You are not signed in. On the sign-in page, you select Continue with your photo account.
Much of what follows will look familiar from Following the complete exchange in the OAuth lessons. That is deliberate, because OpenID Connect reuses the authorization code flow. Following a sign-in from start to finish shows which steps are the same and where the new ones fit.
Choosing Continue
Before any of this can happen, the printer's registration with the photo service needs a return address for sign-in. Connecting a photo account still returns to its OAuth callback. Signing in returns to an address of its own, so the printer handles the two kinds of attempt separately:
Client ID: photo-printer
Redirect URIs:
  https://printer.example/oauth/callback
  https://printer.example/signin/callback
When you select Continue, the printer creates a pending sign-in, much like the pending connection it created in the OAuth lessons. It records what this attempt will need later:
Pending sign-in: demo-signin-3
Initiating session: the current, not yet signed-in printer session
Expected issuer: https://auth.photos.example
Redirect URI: https://printer.example/signin/callback
Nonce: demo-nonce-3
PKCE verifier: held privately on the backend
Return destination: the new photo book page you were viewing
Status: pending, with a limited lifetime
The only new line is the nonce. The printer will ask the photo service to copy it into the ID token, so that it can tell later that the token belongs to this attempt. State and nonce explains how the two values divide the work.
At the photo service
The printer redirects your browser to the photo service's authorization endpoint. The request includes openid in its scope:
https://auth.photos.example/authorize
  ?response_type=code
  &client_id=photo-printer
  &redirect_uri=https%3A%2F%2Fprinter.example%2Fsignin%2Fcallback
  &scope=openid%20profile%20email
  &state=demo-signin-3
  &nonce=demo-nonce-3
  &code_challenge=VJLVyms6-H5HoRQD_d-b-XThm8LNqfrMav0hDI23zpU
  &code_challenge_method=S256
The authentication request reads it parameter by parameter. For now, notice that it asks for sign-in and for your basic profile and email address, and says nothing about your photos.
The photo service checks the request against the printer's registration, as it would any authorization request. Then it establishes who you are. If you signed in to the photo service earlier and its session is still valid, it may not need to ask you for anything. Otherwise you sign in there, with whatever methods your photo account uses. The printer never sees them.
The photo service may also ask whether you are willing to share your profile and email address with Photo Printer. If you agree, or agreed on an earlier visit, it sends your browser back:
HTTP/1.1 302 Found
Location: https://printer.example/signin/callback?code=demo-code-12&state=demo-signin-3&iss=https%3A%2F%2Fauth.photos.example
Cache-Control: no-store
Back at the printer
Everything so far could have been an OAuth connection, and the printer handles the callback in the same way. It finds the pending attempt using state, checks that the attempt belongs to this browser's session, compares iss with the expected issuer, and claims the attempt so it cannot be processed twice.
Its backend then exchanges the code at the token endpoint, with the PKCE verifier and its client authentication. The response is where OpenID Connect becomes visible. Alongside the access token, it contains an id_token.
The printer validates that ID token before believing anything in it. It verifies the signature with the photo service's published key, confirms that the issuer is the photo service and the audience is photo-printer, checks that the token is within its lifetime, and checks that its nonce is demo-nonce-3. Validating an ID token takes these checks one at a time.
Only then does the printer use what the token says. It looks for a printer account linked to user-2048 at https://auth.photos.example. If there is one, that is you. If not, this is your first visit, and the printer creates an account or asks you to finish registering. Connecting a sign-in to an account covers both paths.
Finally, the printer starts a session for you with a new session identifier, rather than giving the anonymous one access to your account, and redirects your browser from the callback address to the photo book page. The callback URL, with its code, does not stay in the address bar.
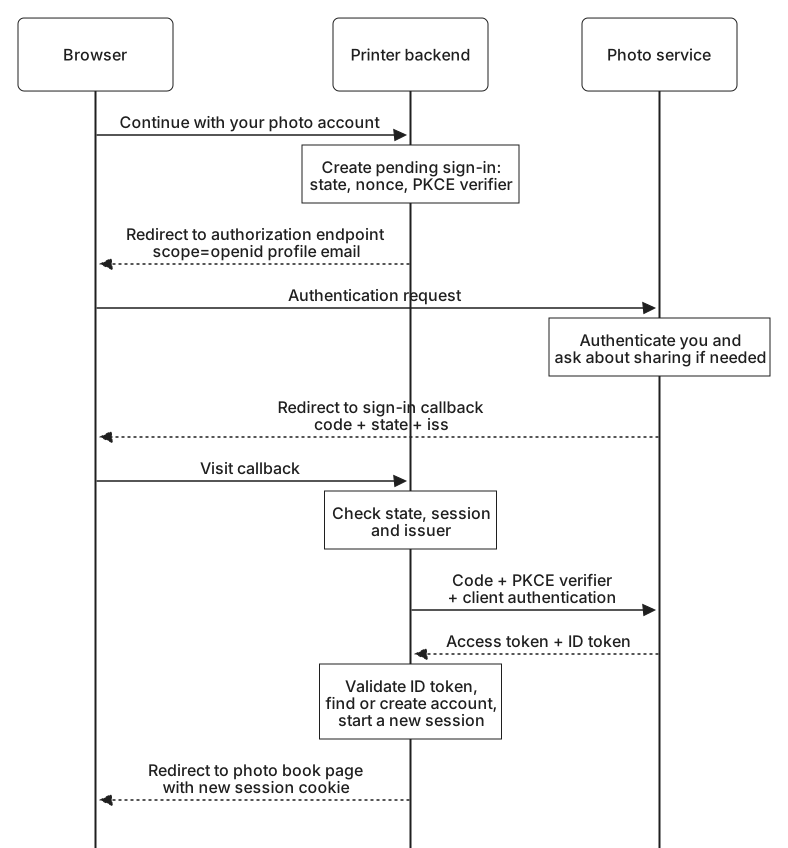
Compared with connecting a photo account, the request gained openid and a nonce, the token response gained an ID token, and the printer gained two jobs: validating that token and turning it into a session of its own. Until both are done, you are not signed in to the printer, even though the photo service already shows you as signed in.